Network infrastructure devices (routers, switches, load balancers, firewalls etc) are among the assets of an enterprise that play an important role in security and thus need to be protected and configured accordingly.
Many enterprises focus on protecting their servers, applications, databases etc but they forget about security of network devices which are sometimes installed with out-of-the-box configurations.
A compromised router for example can be devastating to the whole security of the enterprise since it can be used to gain access to data, reconfigured to route traffic to other destinations, used to launch attacks to other networks, used to gain access to other internal resources etc. Therefore, hardening the network devices themselves is essential for enhancing the whole security of the enterprise.
Cisco separates a network device in 3 functional elements called “Planes”. These are the following:
- Management Plane: This is about the management of a network device. The management plane is used to access, configure, manage and monitor a network device. The security of the management plane is discussed in this article.
- Control Plane: Control plane consists of the protocols and processes that communicate between network devices in order to move data from source to destination. This includes routing protocols such as the BGP, OSPF, signaling protocols etc.
- Data Plane: The data plane is responsible for moving data from source to destination. This is where most data packets are flowing within the network device (usually hardware accelerated as well).
From the three Planes above, the Management Plane first and the Control Plane second are the most important to secure.
In this article we will focus on Management Plane security and discuss the 10 most important steps to harden a Cisco IOS network device.
The security checklist below is not exhaustive but it includes the most important commands and configurations that will lock down a Cisco IOS network device and enhance its security and that of the whole network as well. The checklist below applies to both Cisco Routers and Switches as well.
1) Create an Enable Secret Password
In order to grant privileged administrative access to the IOS device, you should create a strong “Enable Secret” Password. I suggest to use a password with at least 10 characters long consisting of alphanumeric and special symbols.
Make sure to use the “enable secret” command which creates a password with strong encryption.
Router# config terminal
Router(config)# enable secret strongpassword
2) Encrypt Passwords on the device
All the passwords configured on the Cisco device (except the “enable secret”) are shown as clear text in the configuration file. In order to encrypt the clear text passwords and obscure them from showing in the configuration file, use the global command “service password-encryption”.
Router# config terminal
Router(config)# service password-encryption
The command above uses a fairly weak Vigenre cipher which can be decrypted with software tools. It is used mainly to prevent casual observers from reading passwords, such as when they look at the screen over the shoulder of an administrator.
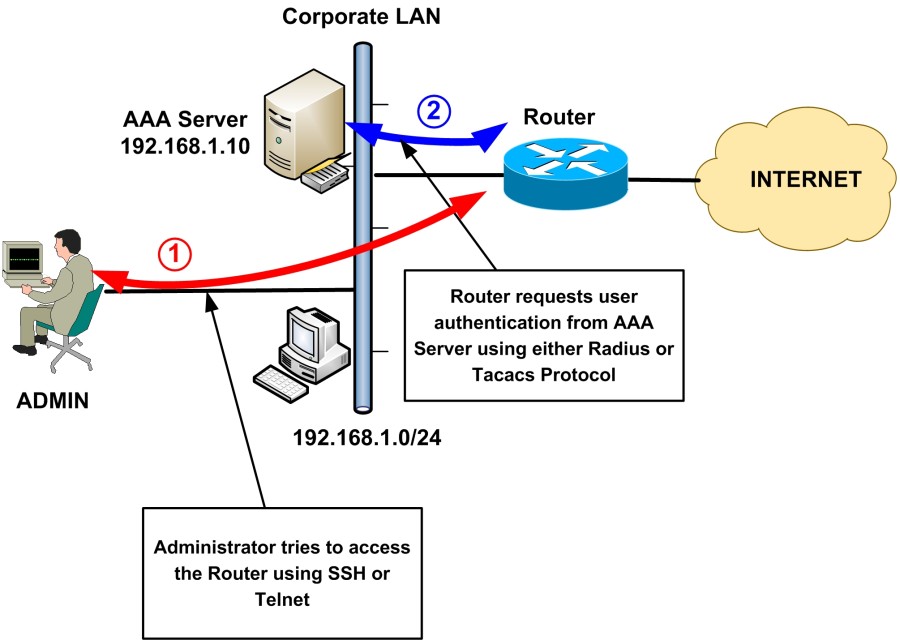
3) Use an external AAA server for User Authentication
Instead of using local user accounts on each device for administrator access, it’s much more secure, flexible and scalable to use an external AAA server (TACACS+ or RADIUS) to handle the Authentication, Authorization and Accounting of users’ access to the devices.
With a centralized AAA server you can easily change/enable/disable account passwords, enforce strong password policies, monitor account usage and user access etc.
Hyperledger Fabric Fundamentals (LFD271)$299
Here we will see how to configure both TACACS+ and RADIUS AAA servers with “enable secret” password as fallback if the AAA server is not available.
TACACS+
Router# config terminal
Router(config)# enable secret K6dn!#scfw35 <- Create first an “enable secret” password
Router(config)# aaa new-model <- Enable the AAA service
Router(config)# aaa authentication login default group tacacs+ enable <-Use TACACS for authentication with “enable” password as fallback
Router(config)# tacacs-server host 192.168.1.10 <- assign the internal AAA server
Router(config)# tacacs-server key ‘secret-key’ <- secret key configured on AAA server
Router(config)# line vty 0 4
Router(config-line)# login authentication default <- Apply AAA authentication to VTY lines (Telnet, SSH etc)
Router(config-line)# exit
Router(config)# line con 0 <- Apply AAA authentication to console port
Router(config-line)# login authentication default
RADIUS
Router# config terminal
Router(config)# enable secret K6dn!#scfw35 <- Create first an “enable secret” password
Router(config)# aaa new-model <- Enable the AAA service
Router(config)# aaa authentication login default group radius enable <- Use RADIUS for authentication with “enable” password as fallback
Router(config)# radius-server host 192.168.1.10 <- assign the internal AAA server
Router(config)# radius-server key ‘secret-key’ <- secret key configured on AAA server
Router(config)# line vty 0 4
Router(config-line)# login authentication default <- Apply AAA authentication to VTY lines (Telnet, SSH etc)
Router(config-line)# exit
Router(config)# line con 0 <- Apply AAA authentication to console port
Router(config-line)# login authentication default
4) Create separate local accounts for User Authentication
If you can’t install and use an external AAA server as discussed in the previous section, at a bare minimum create separate local accounts for anyone that you will give access to your devices.
If you have for example 3 network administrators and you have to use local device accounts for them, then create a personalized user account for each administrator. This accomplishes accountability for each different administrator about the actions performed on the device.
Moreover, from IOS version 12.2(8)T and later you can configure “Enhanced Password Security” for local accounts created on the device. This means that local accounts will be encrypted with MD5 hash.
Let’s configure 3 different local administrator accounts with “Enhanced Password Security”.
Router# config terminal
Router(config)# username john-admin secret Lms!a2eZSf*%
Router(config)# username david-admin secret d4N3$6&%sf
Router(config)# username mary-admin secret 54sxSFT*&(zsd
5) Configure Maximum Failed Authentication Attempts
advertisement
To avoid brute force password attacks to the devices, you can configure maximum number of failed login attempts so that a user will be locked out after this threshold.
$299 WILL ENROLL YOU IN OUR SELF PACED COURSE – LFS205 – ADMINISTERING LINUX ON AZURE!
This works for local user accounts on the devices.
Router# config terminal
Router(config)# username john-admin secret Lms!a2eZSf*%
Router(config)# aaa new-model
Router(config)# aaa local authentication attempts max-fail 5 <- max 5 failed login attempts
Router(config)# aaa authentication login default local
6) Restrict Management Access to the devices to specific IPs only
This is probably one of the most important security configurations on Cisco network devices. You should restrict what IP addresses can Telnet or SSH to your devices. This should be limited to a few management systems that administrators will be using to manage the network.
Assume that the administrators’ subnet is 192.168.1.0/28
Router# config terminal
Router(config)# access-list 10 permit 192.168.1.0 0.0.0.15
Router(config)# line vty 0 15
Router(config)# access-class 10 in <- Apply IP restrictions to all VTY lines (for Telnet or SSH)
7) Enable Logging
Logging is very useful for monitoring, incident response and auditing. You can enable logging to an internal buffer of the device or to an external Log server. The latter is much more flexible and helpful since you can store much more log data and perform analysis on logs much easier than local logging.
There are 8 different logging levels (from 0 to 7) each one giving progressively more log data details. You should avoid logging level 7 (debug) since it will overload the device.
Here we will discuss both buffered logging (internal to the device) and Logging to an external Server. You can have both if you want as shown below.
Router# config terminal
Router(config)# logging trap 6 <- Enable logging level 6 for logs sent to external server
Router(config)# logging buffered 5 <- Enable logging level 5 for logs stored locally in buffer
Router(config)# service timestamps log datetime msec show-timezone <- Include timestamps in logs with millisecond precision
Router(config)# logging host 192.168.1.2 <- Send logs to external log server
Router(config)# logging source-interface ethernet 1/0 <- Use Eth1/0 to send log messages
8) Enable Network Time Protocol (NTP)
This step is essential for the previous section about logging. You must have accurate and uniform clock settings on all network devices in order for log data to be stamped with the correct time and timezone. This will help tremendously in incident handling and proper log monitoring and correlation.
You can either configure an internal or external NTP server (there are several public NTP servers that you can use as well).
Router# config terminal
Router(config)# ntp server 1.1.1.1
Router(config)# ntp server 2.2.2.2
9) Use Secure Management Protocols if possible
Telnet is the default management protocol for Command Line access to Cisco devices. However, all management traffic is clear-text with Telnet. For security reasons, prefer SSH for management instead of Telnet.
Let’s see how to configure SSH access to a Cisco device.
Router# config terminal
Router(config)# hostname London
London(config)# ip domain-name mydomain.com
London(config)# ip ssh version 2
London(config)# crypto key generate rsa modulus 2048
London(config)# ip ssh time-out 60
London(config)# ip ssh authentication-retries 3
London(config)# line vty 0 15
London(config-line)# transport input ssh
SSH requires to have a hostname and domain-name configured and also to generate SSH keys. Also, on VTY lines allow SSH protocol only.
10) Restrict and Secure SNMP Access
The Simple Network Management Protocol (SNMP) can be very useful to collect information from network devices but can also pose a security risk if not configured properly.
SNMP protocol uses a “Community String” which acts as password for restricting access (Read Only or Read/Write) to the SNMP data on the device. In addition to configuring a strong Community String, IP filtering must also be applied to allow SNMP access only from few management workstations.
Let’s configure two Community strings (one “READ ONLY” and another one “READ/WRITE”) and also apply IP address control with ACLs.
Router# config terminal
Router(config)# access-list 11 permit 192.168.1.0 0.0.0.15
Router(config)# access-list 12 permit 192.168.1.1
Router(config)# snmp-server community Cbd43@#w5SDF RO 11 <- Create Read Only (RO) community string and use ACL 11 to allow SNMP access
Router(config)# snmp-server community Xcv4#56&454sdS RW 12 <- Create Read Write (RW) community string and use ACL 12 to allow SNMP access
The above commands allow the administrators subnet 192.168.1.0/28 to have Read Only SNMP access to devices and also allows host 192.168.1.1 to have full Read/Write SNMP access to devices.
By:
Harris Andrea
Full article: https://www.networkstraining.com/cisco-router-switch-security-configuration-guide/

Leave a comment