Internet users are spoiled for choice when it comes to VPN services, but they either require a monthly subscription, aren’t secure, or are just plain slow. Thankfully, alternatives do exist. They require a bit more technical know-how, but if you want something done right, you have to do it yourself.
Getting started
Amazon Web Services offers one year of free virtual server space, provided you use less than predetermined amounts of bandwidth, time and space. Even if you go over that limit, the cost of running a server image on Amazon’s Elastic Compute Cloud is probably less than you would pay for a VPN subscription.
Here we’ll explain two different ways to use Amazon’s Elastic Cloud service, also called EC2, to divert your connection through a private location of your choice: SSH Tunneling and OpenVPN. Each has advantages and disadvantages, so use the one you find more suited to your needs. No matter which you choose, you’ll require the following:
- An Amazon Web Services account. This requires a credit card, but you’ll only be charged for what you use, which will likely be nothing if you’re prudent about what you’re doing.
- PuTTy, if you’re on Windows. OpenSSH via Cygwin is another option, but I found it to be a pain. Linux and Mac computers already have SSH prompts built into their boxes and terminals. You’ll also need PuTTy’s sister key generation program, PuttyGen.
- WinSCP, or an equivalent FTP client to move files between your local computer and your EC2 instance.
- A basic working knowledge of Unix commands and how servers work with clients will be massively helpful in troubleshooting should something not go exactly as planned.
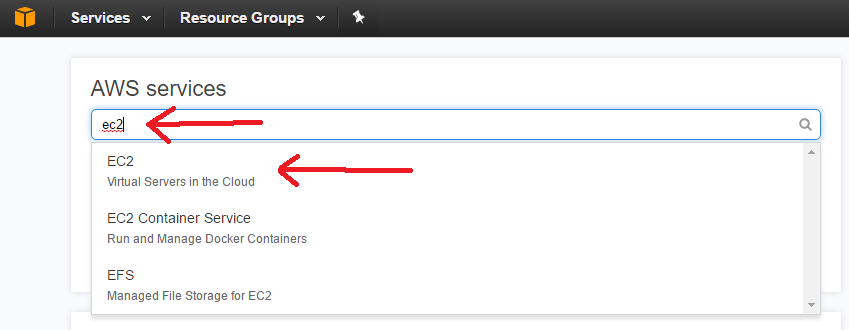
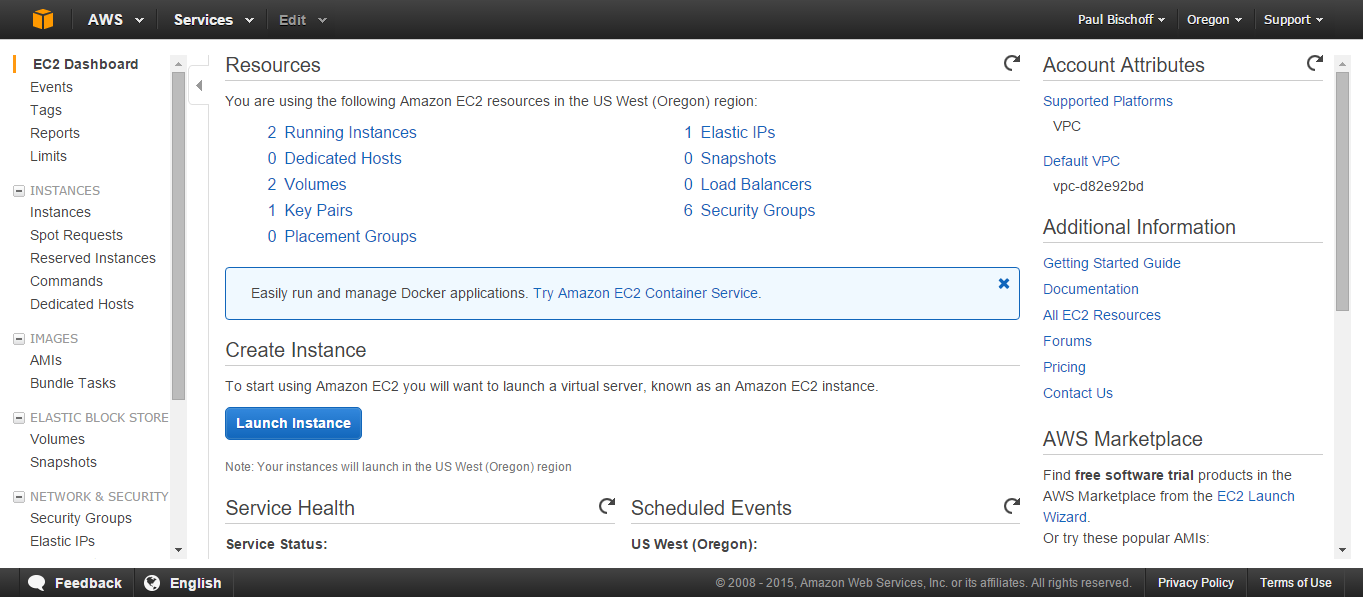
Log into your Amazon Web Service account and head to the EC2 dashboard.
On the top right, you can choose the location where we’ll be setting up your VPN. Click Launch Instance.
Choose whatever Linux AMI is listed as “free tier eligible.” At the time of writing this article, that’s the Amazon Linux AMI. Go on to the next step.
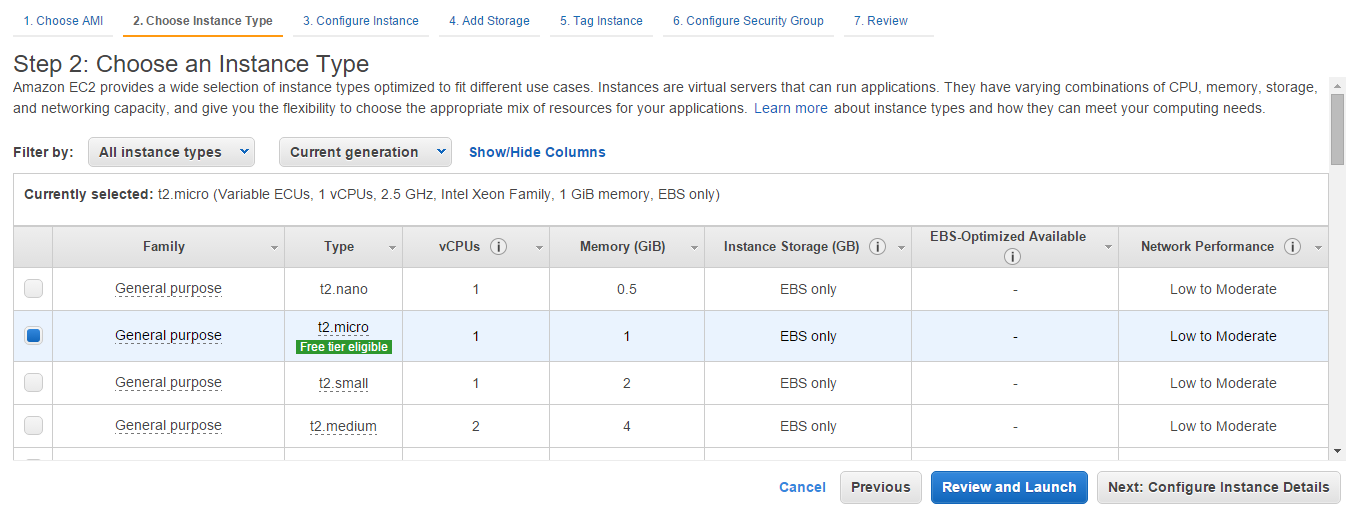
Here choose a t2.micro instance that’s also free tier eligible. Click “Review and Launch.”
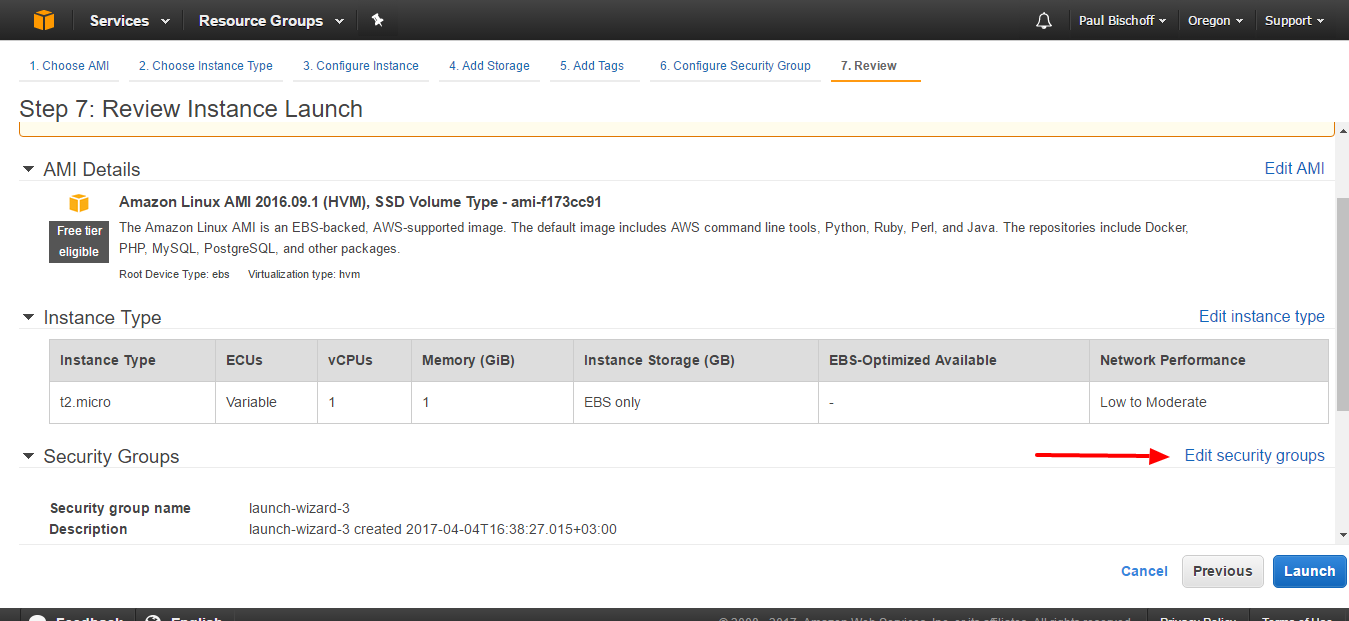
On the next page,
you should get a warning message asking you to edit your security groups.Click Edit Security Groups.
You’ll need edit the security group to only allow traffic from your computer to access the VPN or proxy. You should have one rule already in place for connecting to your server via SSH, which we’ll use later. We’ll need to add another to allow OpenVPN connections, which use port 1194 by default. For simplicity’s sake, under the Inbound tab, click the Add rulebutton. Set the Type to Custom UDP, the Port Range to 1194, and the Source to Anywhere.
Hit Save.
Click “review and launch,” then “launch” on the next page.
ENROLL TODAY IN THE DevOps Fundamentals: Implementing Continuous Delivery SELF PACED COURSE! $199
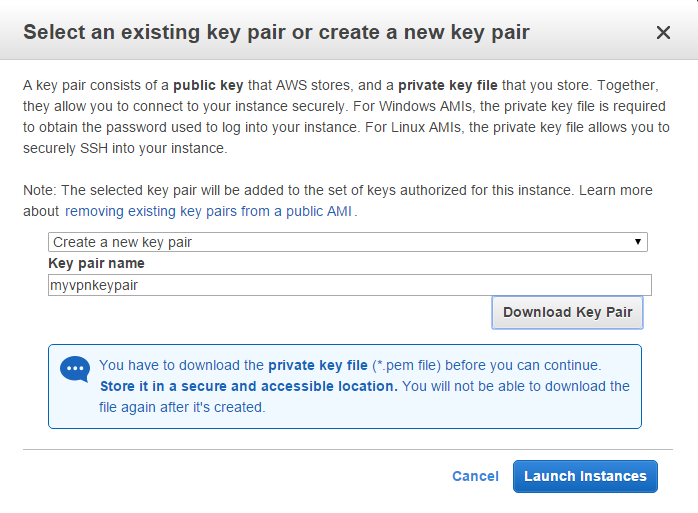
Now you’ll want to create a key pair, which sort of works like a password that you’ll use to connect to the virtual server you’re creating. Select “create a new key pair” from the dropdown menu and name it whatever you like. Click the button to download the key pair. Store it somewhere safe.
The next page should alert you that the instance is launching. Scroll to the bottom and hit “View instances.” Here you’ll see a list of any instances you’ve launched, which if this is your first time using EC2 will just be one.
SSH Tunneling
To begin with, we’re just going to reroute web traffic through the instance we created using SSH tunneling and a proxy. This is a quick and dirty way to get around a firewall or geographic lockout. It’s not quite a VPN–it’s best for light web traffic and won’t work with everything–but it’s much more simple to set up. This tutorial will explain how to interact with your instance using Windows. To do that, you’ll need to download PuTTy and PuTTygen.
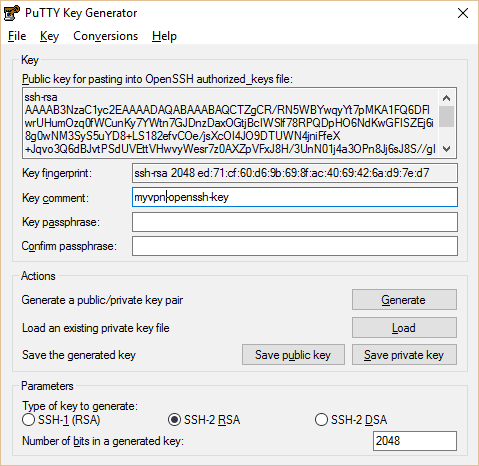
PuTTy and PuTTygen both run right out of the box as .exe files with no need to install. Open PuTTygen, click Load. Navigate to the .pem key pair file you downloaded before and load it into Puttygen. You’ll have to select the option to show all file types for the .pem key to show up. Hit “Save Private Key.” The file name must be identical to the .pem key. You can create a passphrase for the private key if you want.
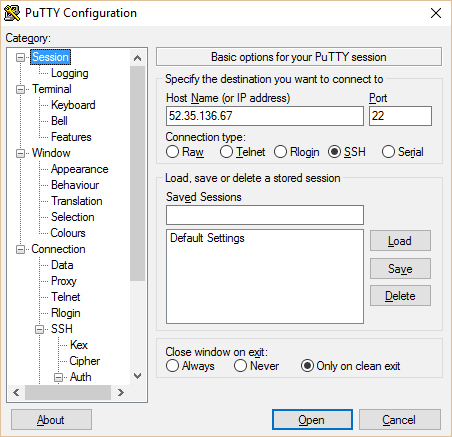
Now close out of PuTTygen and open PuTTy. Copy your instance’s public IP from the EC2 console into PuTTy. Type in a name for your session and hit save.
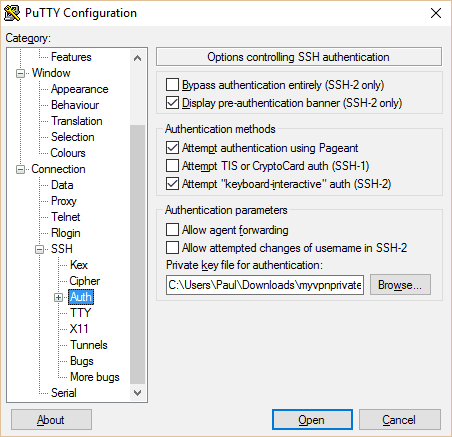
In the left pane, navigate to “Auth” under SSH. Click the browse button at the bottom and navigate to the private key you just generated.ENROLL TODAY IN THE DevOps Fundamentals: Implementing Continuous Delivery SELF PACED COURSE! $199
Navigate to Tunnels in the left pain. Add port 8080 with Auto and Dynamic selected. Go back to the Session page and hit Save again so you don’t have to do all this over again.
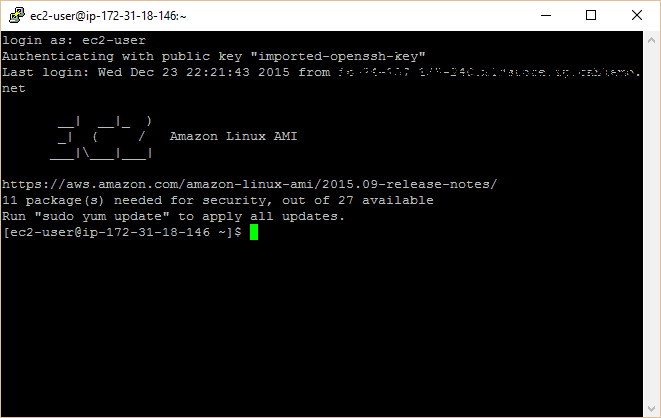
Click Open. A prompt will appear asking you for a username. This differs based on what type of server you set up at the beginning. For the Amazon Linux AMI, it’s “ec2-user”.
Now you’re connected to your server, but you still need to route your web browser’s traffic through it. If you use Firefox, this can be done in your browser settings. If you use Chrome, download the Proxy Switchy extension. If you prefer to create a fully functioning VPN rather than just a proxy for your browser, skip to the next section now.
In Firefox:
- Go to Tools > Options > Advanced > Network > Connection > Settings > Manual proxy configuration
- Set SOCKS Host as 127.0.0.1 and the port as 8080 (or whatever you set the tunnel port to on PuTTy).
- Click OK to save
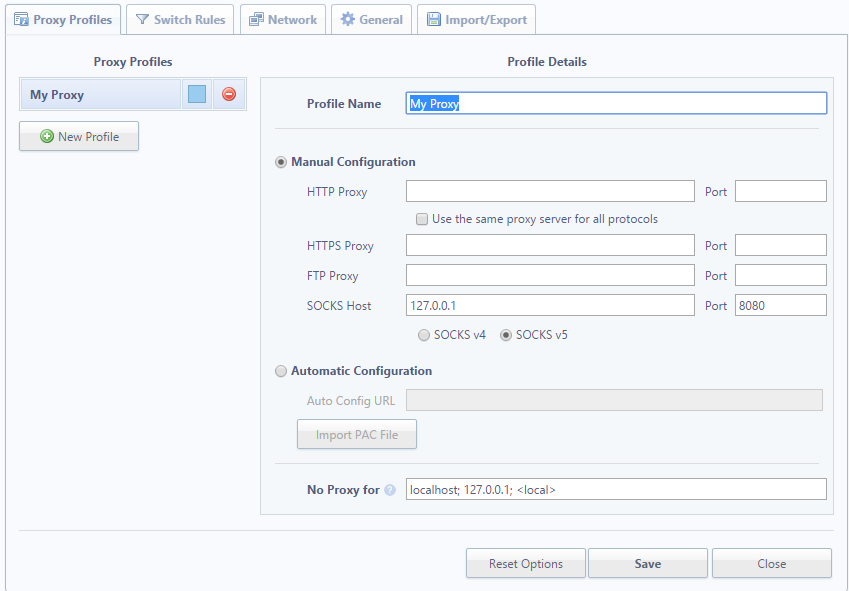
In Chrome Proxy Switchy
- A setup page should appear as soon as you install the extension, or click the icon in the top right of Chrome and click Options.
- Name the profile whatever you like. Under Manual Configuration, set the SOCKS host to 127.0.0.1 and the port to 8080 (or whatever you set the tunnel port to in PuTTy. Leave everything else blank.
- Hit Save, then click the icon again to select your proxy profile.
Voila! Your browser traffic is now being funneled through your EC2 instance. This will work fine for basic browsing, but some websites might run into problems and apps other than your web browser will still use the direct connection. To create a full-on VPN that reroutes all your internet traffic, read on.
Installing OpenVPN on the server
OpenVPN is a free open source tool that will let you run a full-on VPN through your Amazon EC2 instance. That means all your internet traffic goes through it, not just your web browser traffic like the proxy above. Desktop programs such as Steam or Spotify work better with this approach.
ENROLL TODAY IN THE DevOps Fundamentals: Implementing Continuous Delivery SELF PACED COURSE! $199
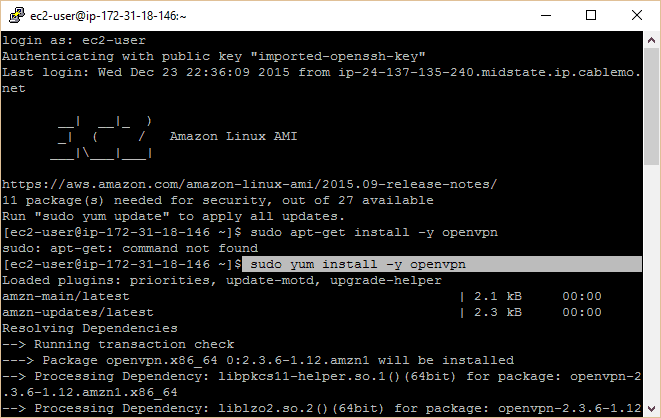
Connect to your EC2 instance using PuTTy according to the instructions above. You should have a command prompt in front of you that says Amazon Linux AMI. Run the following commands (type or copy/paste them and press enter):
sudo yum install -y openvpn
sudo modprobe iptable_nat
echo 1 | sudo tee /proc/sys/net/ipv4/ip_forward
sudo iptables -t nat -A POSTROUTING -s 10.4.0.1/2 -o eth0 -j MASQUERADE
sudo iptables -t nat -A POSTROUTING -s 10.8.0.0/24 -o eth0 -j MASQUERADE
Just a quick note here. You might have noticed in the screenshot that I incorrectly tried to download and install OpenVPN using the “apt-get” command instead of “yum”. Some other versions of Linux still use apt-get, so if yum doesn’t work for you, try this command instead:
sudo apt-get install -y openvpnA bunch of text will flash on the command prompt while it installs OpenVPN. The other three commands set up IP forwarding, which is necessary for the VPN to work.
Method #1: Setting up PKI authentication with easy-rsa (recommended)
In the original version of this tutorial, we set up OpenVPN with static encryption and a .ovpn file. While that works, it only allows one device to be connected at a time, and the fact that you only ever use one key means it’s less secure. We now recommend readers use easy-rsa to set up authentication, which is more secure and allows for any number of devices to be simultaneously connected. However, if you want the old version with static encryption, skip to it by clicking here.
Easy-rsa is not available in the default yum package list, so we’ll need to enable the EPEL repo to install it. Type the following into the PuTTy terminal and hit Enter after each:
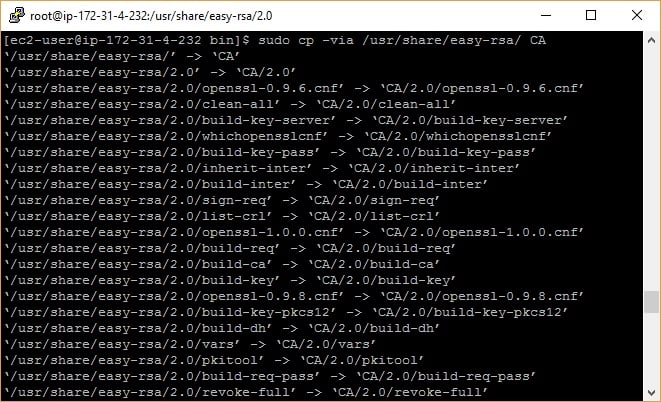
sudo yum install easy-rsa -y --enablerepo=epel
sudo cp -via /usr/share/easy-rsa/2.0 CA
The second command creates a directory with all of the working files we need to set up our certificate authority.
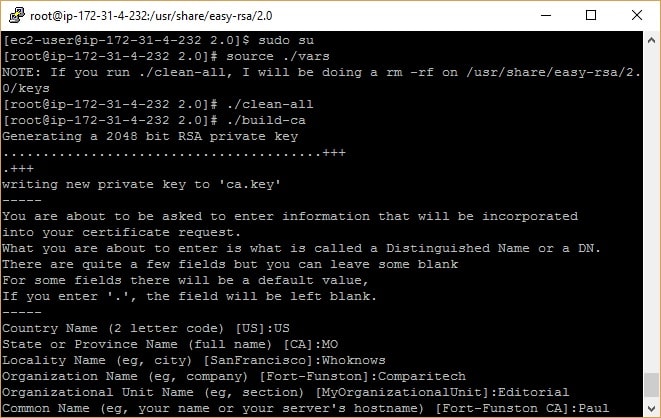
For the next steps, we need to be root user. Simply typing in “sudo” before your command won’t work here, so the rest of this tutorial will be as root user. In the Amazon Linux AMI, by default, you can access root with the following command:sudo suNotice the user is now “root” instead of “ec2-user”. Now to use easy-rsa to generate up certificates and keys. Enter each of the following commands one at a time. Many will ask you to fill in details about your occupation and company. You can leave these as default just by hitting Enter. It makes no technical difference so long as you’re using this as a personal VPN. When setting up the server key, we recommend not setting a password so that OpenVPN can start up unattended. Setting a password on the client key will force users to enter a password before connecting.
cd /usr/share/easy-rsa/2.0/CA
source ./vars
./clean-all
./build-ca
./build-key-server server
./build-dh 2048
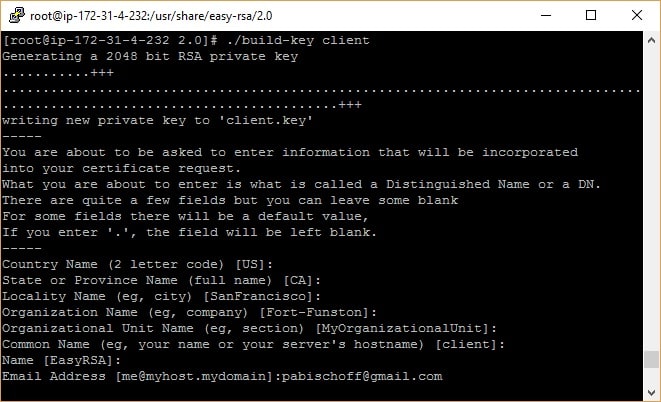
That’s all that’s needed to get the OpenVPN server up and running, but each client will need its own credentials. For each client device you want to connect, run this command:./build-key client
In this tutorial, we’ll only be setting up one client. You now have all the RSA keys and certificates needed, but you still need to generate a TLS key to be used for Perfect Forward Secrecy. This will ensure that if a key is compromised it can’t be used to decrypt past sessions.$199 ENROLLS YOU INTO THE CONTAINERS FOR DEVELOPERS AND QUALITY ASSURANCE COURSE (LFS254)!
cd /usr/share/easy-rsa/2.0/CA/keys
openvpn --genkey --secret pfs.key
With all of the files ready, we need to move them into the OpenVPN directory. First we’ll create a keys directory, then copy all of the keys and certificates into it.
mkdir /etc/openvpn/keys
for file in server.crt server.key ca.crt dh2048.pem pfs.key; do cp $file /etc/openvpn/keys/; done
Next we’ll create a server configuration file that ties everything together. We’ve already got one written up for you below, so all you need to do is copy and paste. Start by navigating to the OpenVPN directory and creating a new file:
cd /etc/openvpn
nano server.conf
You are now in the nano text editor. Copy and paste the following config, then hit CTRL+Oto save, hit enter to confirm, and CTRL+X to exit. (Hint: you can paste text from your clipboard into PuTTy just by right-clicking)
port 1194
proto udp
dev tun
ca /etc/openvpn/keys/ca.crt
cert /etc/openvpn/keys/server.crt
key /etc/openvpn/keys/server.key # This file should be kept secret
dh /etc/openvpn/keys/dh2048.pem
cipher AES-256-CBC
auth SHA512
server 10.8.0.0 255.255.255.0
push "redirect-gateway def1 bypass-dhcp"
push "dhcp-option DNS 8.8.8.8"
push "dhcp-option DNS 8.8.4.4"
ifconfig-pool-persist ipp.txt
keepalive 10 120
comp-lzo
persist-key
persist-tun
status openvpn-status.log
log-append  openvpn.log
verb 3
tls-server
tls-auth /etc/openvpn/keys/pfs.key
The server is now configured. We just need to start up OpenVPN. We’ll start it as a service so that even after you close PuTTy, it will continue to run until the server is either shut down or you manually end the service.
sudo service openvpn startEdit: Some readers have pointed out that their VPN servers stop working after a server reboot or maintenance. This happens occasionally with micro tier EC2 instances. To prevent this, we need to set up OpenVPN as a service. You can do this by entering the following commands:
sudo systemctl start openvpn@server.service
sudo systemctl enable openvpn@server.service
If your server reboots and you find that you can connect to the VPN but not to the web, you may need to reset your iptables settings. Just connect to your server and use the same commands from above:
echo 1 | sudo tee /proc/sys/net/ipv4/ip_forward
sudo iptables -t nat -A POSTROUTING -s 10.4.0.1/2 -o eth0 -j MASQUERADE
sudo iptables -t nat -A POSTROUTING -s 10.8.0.0/24 -o eth0 -j MASQUERADECheck out this StackExchange thread to learn how to save iptables configurations so they automatically restore upon reboot.
SPEND $199 AND ENROLL IN OUR SELF PACED CONTAINERS FUNDAMENTALS COURSE (LFS253)!
Now that the server is configured, we need to set up the client. To do that, we’ll have to move the necessary certificate and key files from our server to our client device. With PuTTy still open and running as root, we first need to change the permissions on these files so that we can access them.
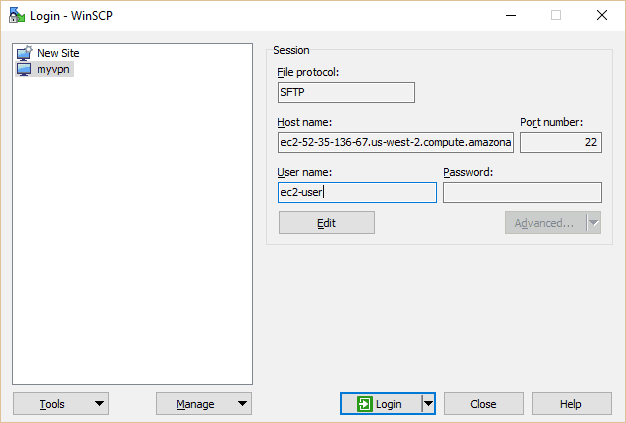
cd /usr/share/easy-rsa/2.0/CA
chmod 777 keys
cd keys
for file in client.crt client.key ca.crt dh2048.pem pfs.key ca.key; do sudo chmod 777 $file; done
To get the files off of our server and onto our PC, we’ll use a free program called WinSCP. Just use the default installation options. Once that’s done, a Window should pop up prompting you to import your server authentication details from PuTTy. Select the one we made above and continue.
Select myvpn (or whatever you named yours) and hit the Edit button. Type in ec2-userunder user name. Click on Login.
If this isn’t your first time using WinSCP, you can set the .ppk file you used in PuTTy by clicking Edit and Advanced. Go to SSH > Authentication > Private key file and navigate to your PPK file. In the host name field on the main page, you can enter either the IP address or domain of your EC2 instance. Be sure to save your settings.
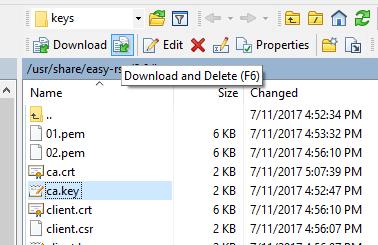
In the right pane, navigate to the directory containing your key files, in this case /usr/share/easy-rsa/2.0/CA/keys
Highlight the five files you’ll need on the client: client.crt, client.key, ca.crt, dh2048.pem, and pfs.key. Hit the green Download button. It doesn’t really matter where they go on the left pane so long as you don’t need admin priveleges to access it. We put the files on our desktop for simplicity’s sake.The last loose end we need to do tie up is removing the ca.key file from the server. The CA, or certificate authority, is used to sign client certificates,and, if it is ever compromised, you can never trust certificates issued by that CA again. While this isn’t necessary for the VPN to work, we strongly recommend doing it. Make sure you’ve all the keys and certificates for every device you want to connect before removing the file. If you want to add more at a later time, you will have to move the ca.key file back onto the server.
We’re going to move the file onto our PC in the same way as we did for the client certificates and keys. This time, however, instead of using the basic “Download” button, use the Download and Delete button to move the ca.key file from your server to your PC. Store it in a secure location.
Once the files have downloaded, we need to restore their stricter permissions on the server so not just anyone can access them. Back in PuTTy:
for file in client.crt client.key ca.crt dh2048.pem pfs.key; do sudo chmod 600 $file; done
cd ..
chmod 600 keys
On your PC, cut and paste those five files from wherever you downloaded them into your OpenVPN config folder. In this case that’s C://Program Files//OpenVPN//config.
Lastly, we need to create a client configuration file. Open your favorite plaintext editor (Notepad works fine) by right clicking and selecting Run as administrator and paste the following config:
client
dev tun
proto udp
remote YOUR.EC2.INSTANCE.IP 1194
ca ca.crt
cert client.crt
key client.key
tls-version-min 1.2
tls-cipher TLS-ECDHE-RSA-WITH-AES-128-GCM-SHA256:TLS-ECDHE-ECDSA-WITH-AES-128-GCM-SHA256:TLS-ECDHE-RSA-WITH-AES-256-GCM-SHA384:TLS-DHE-RSA-WITH-AES-256-CBC-SHA256
cipher AES-256-CBC
auth SHA512
resolv-retry infinite
auth-retry none
nobind
persist-key
persist-tun
ns-cert-type server
comp-lzo
verb 3
tls-client
tls-auth pfs.key
This is a Windows config file for the OpenVPN GUI, so we’ll save it as client.ovpn. Other OpenVPN clients might use the .conf extension instead. Whatever the case, make sure your text editor doesn’t add the .txt extension after saving. Save it into the same location as your key and certification files: C:\\Program Files\\OpenVPN\\config
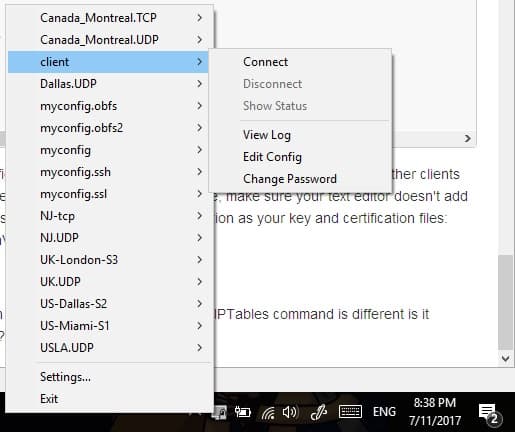
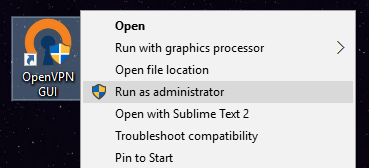
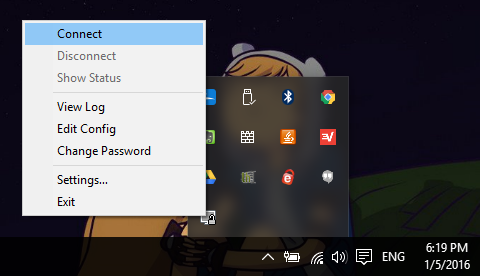
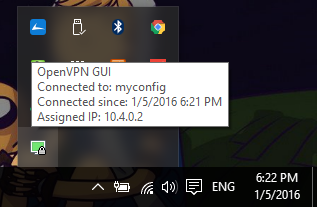
Now run the OpenVPN GUI in administrator mode by right clicking it and selecting Run as administrator. Right click the icon in your system tray and connect with the clientconfiguration we just set up. A status screen with loads of text will flash across the screen, and then the icon will turn green.
BUNDLE CLOUD FOUNDRY FOR DEVELOPERS COURSE(LFD232) AND THE CFCD CERTIFICATION FOR $499!
Congratulations! You are now connected to your homemade VPN.
Method #2: Static encryption (easier, but not recommended)
In this method, we’ll create a shared key for authentication. It’s sort of like a file that acts as a password. It’s easier to set up but only allows a single device to be connected to the VPN at any one time, and is less secure than the easy-rsa method above. In PuTTy Type in the following commands and hit enter:
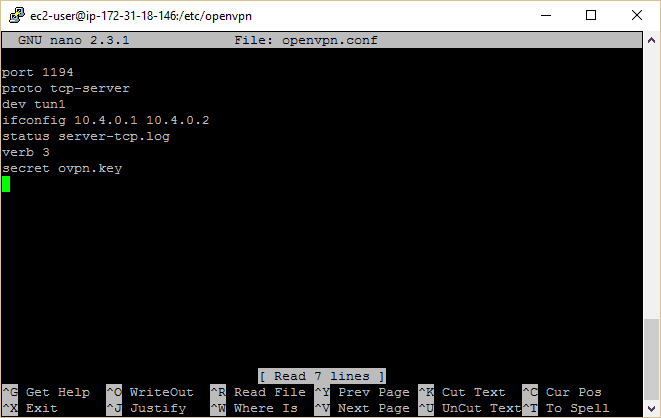
cd /etc/openvpn
sudo openvpn --genkey --secret ovpn.key
Now we’re going to create a server config file for our VPN. Type the following command to create a blank text file in a very basic text editor inside the terminal:
sudo nano openvpn.confType in the following configuration. You can find more options on the OpenVPN website if you want to play around with this later, but make sure you know what you’re doing first.
port 1194
proto tcp-server
dev tun1
ifconfig 10.4.0.1 10.4.0.2
status server-tcp.log
verb 3
secret  ovpn.key
Now hit CTRL+O (that’s the letter ‘O’ not zero) and hit enter to save the file. Then hit CTRL+X to exit the text editor. Back at the command prompt, it’s time to fire up OpenVPN:sudo service openvpn startNext we need to get the shared key from the server to your local computer. First we need to change the permissions on that file so we can access it using the following command:
sudo chmod 777 ovpn.keyIf at any point you accidentally close PuTTy or it just craps out, you can navigate back to your open VPN installation directory after reconnecting using this command:
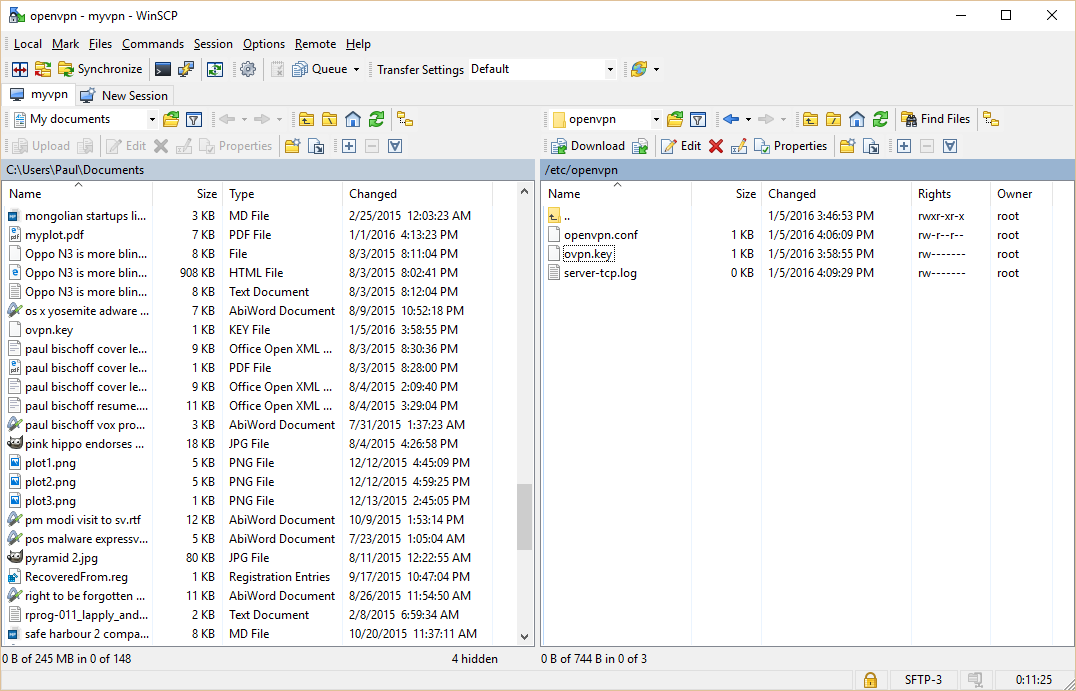
cd /etc/openvpnTo make this as easy as possible, download and install this free application, WinSCP (Mac users will have to find another FTP client. Don’t worry, there are lots of them). Just use the default installation options. Once that’s done, a Window should pop up prompting you to import your server authentication details from PuTTy. Select the one we made above and continue.
Select myvpn (or whatever you named yours) and hit the Edit button. Type in “ec2-user” under user name. Click on Login.
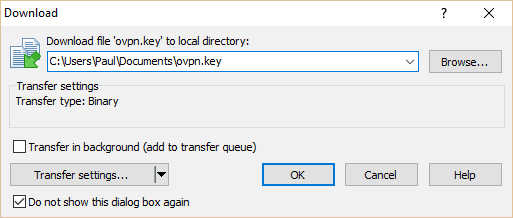
Now you can move files between your EC2 instance server and your local computer. On the right hand panel, navigate up as far as you can, then go to etc/openvpn. Here you’ll find the ovpn.key file that we need. Click and drag it into the folder of your choice, but remember where you put it as we’ll want to move it later.
Now that you have the key, we need to re-apply the old permissions so not just anyone can grab it. Back in your PuTTy terminal, enter:sudo chmod 600 ovpn.keyIt’s time to download the OpenVPN client and GUI for your local computer. Go to the OpenVPN downloads page and choose the appropriate version for your operating system. Install it with the default settings. It should appear in your system tray as an icon once launched. Open up a file explorer and navigate to where you installed OpenVPN, probably in your Program Files folder. Move the opvn.key file we downloaded from the server to the config folder found here (C:/Program Files/OpenVPN/config … if you used the default installation directory on Windows).
$299 WILL ENROLL YOU IN OUR SELF PACED COURSE – LFS205 – ADMINISTERING LINUX ON AZURE!
Next we need to create a config file for the local machine to match the one we made on our server. Open up Notepad and paste the following, replacing the IP address after “remote” with the IP of your EC2 instance (if you’ve forgotten it, find it in your AWS Console under EC2 Instances). Also double check that the full file path pointing to your key is correct.
proto tcp-client
remote
port 1194
dev tun
secret "C:\\Program Files\\OpenVPN\\config\\ovpn.key"
redirect-gateway def1
ifconfig 10.4.0.2 10.4.0.1
Save it as myconfig.ovpn (make sure your text editor doesn’t append it as myconfig.ovpn.txt by mistake) in the config folder of your OpenVPN installation, the same place as your opvn.key file.
Right click on the OpenVPN icon in your system tray and click Exit to quit. Now start it up again–either from the desktop shortcut or from the Program Files folder–but this time use right click and hit “Run as administrator”. If you don’t run OpenVPN as administrator on Windows, it probably won’t work.
Right click the system tray icon and click Connect. The OpenVPN GUI should pop up showing you the connection status. Assuming it worked, the system tray icon will turn green. Go to Google and type in “What’s my IP?”, and it should return the IP address of your Amazon EC2 Instance.
Congratulations, you just made your own VPN!
Published by Paul Bischoff on April 4, 2017
Full article:


via How to make your own free VPN with Amazon Web Services


Leave a comment